Sunday, July 31, 2022

Painting delay for the wings

      The next step in painting the wings of the osprey carving involves the used of a dark sable color, almost black, for the banding and shading on the tail and flight feathers.  Unfortunately, when I sat down at the bench today, I learned that the sable color had I ordered is not dark at all, but almost like the nutmeg brown.  I tried darkening it with several different possible complementary blue shades that I have, but couldn’t match the color swatch in Al Jordan’s book.  I tried using black to darken the sable brown, which produced something much closer to the published color, nut just a little dead-looking.  It might work in a pinch, since the color it produced was close to the color in the workbook, but I want the colors to be the same as used by the original carver/artist. 

     I then had an insight - Al Jordan used an airbrush to paint much of his carving, so I looked into airbrush acrylic colors.  Bingo!  On a carving supplies website I found the very dark sable he used, manufactured by Chroma, and ordered some.  I checked first to see if airbrush colors can be used with a brush, and they can.  The only difference between airbrush acrylics and those from a bottle or tube is that the airbrush colors are diluted in order to pass easily through the airbrush nozzle.  This actually helps, because I would not have to dilute it much or at all to use it as a wash over other colors.  I will see when it arrives, whenever that is.

  In the meantime, I may do some painting today on other parts of the carving, such as the feet, just to get something done and not lose momentum.


Thursday, July 28, 2022

Painting has begun

    I added a second coat of gesso last night, to prepare for today's painting session.  I am following the painting guidelines in Al Jordan's half-size osprey book, although not necessarily in the same order because of the difference in the poses of his carving and mine.

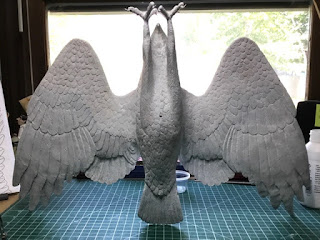
    I started by applying three coats of a dilute mixture of 90% warm white and 10% raw umber on the undersides of the tail and the primary and secondary feathers.  Once that was completely dry, I turned the carving over and applied three coats of a thin nutmeg brown color over the entire back of the body, tail, and wings.  Not much of this nutmeg color will show through at the end, but hints of it will still be there.  The back and upper side of the wings will be much darker when the painting is done.  Here are the photos:


    The colors and patterns don't look quite right at the moment, but I am trusting the professional's painting instructions.  The dark spot on the bird's breast between the extended legs is the hole where the clear acrylic rod will be inserted to support the bird on the stand.  Speaking of the stand:  I have decided to make the stand an oval, and I drew an oval shape on the practice stand using the old trick of three pins and some string.  Worked like a charm.  I will cut out the oval shape with my saber saw and set the bird on the stand to see if it is stable.

     Lona took some photos of me working, a couple of which are posted below.  The pages visible in the background are from the painting section of Al Jordan’s book.


    The next painting steps will be to add dark bands to the undersides and topsides of the tail feathers and to the primary and secondary feathers on the wings, which will be difficult for an amateur painter like myself.  these bands are visible in the pictures in the book in the background.  It will require some careful planning, matching of the bands on the upper and lower sides of the feathers, and some washes of a darker color over these feathers to blend the colors together and accentuate the leading edges of the feathers.  I will just follow the instructions and see what happens!

    Enough for now, the painting took about two hours, since I had to let each layer of paint dry before adding the next.  The reasons for using thin washes of color is to preserve the texturing of the feathers, which took such a long time to do.  One thick layer of paint would fill in all the burn lines representing the barbs of the stiff feathers; three thin washes will achieve the same color but preserve the feather details.

    Total time: 113 hours.

Tuesday, July 26, 2022

First coat of gesso

    This afternoon I applied the first coat of gesso to the fully sealed carving.  This first coat almost completely concealed the dark brown of the burned areas.  The second coat should provide the uniform white base coat for applying the different washes of color that will be the actual color of the bird.  Looks different, all white.


     I found a small area at the edge of one wing where I hadn't defined the feathers completely.  Don't know how I missed it.  I will have to to the detailing, and re-gesso the area before I continue.  I will let the carving dry completely before attempting that little repair job.

    I remembered from early in the carving process that the bird would stand up vertically on a tripod formed by its wingtips and tail.  It is pretty steady, but I won't leave it that way for too long, just until the gesso is dry.  A bump on the bench might cause it to fall over!

    Two more hours, for a total of 111.

Monday, July 25, 2022

Mock-up of base for carving

    I did two things today - apply the first coat of sanding sealer and put together a mock-up of the eventual base I will make for the carving.  Sanding sealer?  Not much to say about that, except that I didn't put any on the head and feet because that was where I had to hold the carving while I sealed the rest.  Later tonight I will apply sealer to the head and legs, and tomorrow I will put a second coat over the whole thing.

    I decided, after much thought, to simply support the carving on its base with a single rod extending from the belly of the bird down to the base.  I ordered some clear acrylic 3/36" diameter rods from an online acrylic products company, but for the time being I used a 3/36" wooden dowel in my trial run.  I carefully drilled a hole in the centerline of the belly at an angle that would support the bird in a diving pose.  I then drilled a hole in a 1.5" thick piece of pine board from the garage, and put the assembly together.  This is the result:


     The result is very close to the vision I had at the start.  I wish that the diving angle were a little steeper, but the hole in the belly is already drilled and I can't redo it without making a mess.  What I have done will suffice, for sure.  A small concern that I have is that the wooden dowel bends somewhat under the weight of the carving, which I didn't think it would do.  I didn't get the hole quite under the center of gravity of the carving, and it leans a little forward.  I am hoping that the clear acrylic rods will be a little stronger and support the carving without bending.

    By using the clear rod as an obvious support, I don't have to be too clever about making the support look like reeds or grass, which would have taken a lot of work.  I would also have had to make the flat part of the base look like water or else the realistic reeds would not look right.  I can now go back to making the flat part of the base an abstract form with a simple, rippled surface.  The plain base and the clear support will not call attention away from the carving.  Viewers will accept the base and support for what they are, and move their attention back to the carving itself.  That's my hope, anyway.

    The piece of scrap wood in the photos above is too big, but I will use it as a starting point for trimming down the rectangular shape or for possibly creating a more visually pleasing shape such as an oval.

    Maybe another hour today, for a running today of 109 hours invested so far. My first post on this blog was May 3, so I am coming up on three months of work.  I could have gotten to this point faster, but if you have to rush, it's not a hobby any more.


Sunday, July 24, 2022

Lots of progress!

    I had a good day yesterday, working about 5 hours on the carving.  I finished the texturing/burning on the wings; put in the glass eyes; finished burning the feathers around the eyes and beak; and attached the feet.  The latter job involved putting a ring of epoxy clay around the wire protruding from the upper part of each foot, and pressing the foot into place against the wooden stump.  The epoxy squeezed out, which is what I wanted to happen, to make sure that the gap between the two parts was filled with epoxy.  It dried fast, and I removed the excess and worked a little with two different power carving tips to blend the texturing over the transition point and obscure it even more.  Below are some photos I took this morning out on the picnic table, in 88-degree heat.


    In preparation for the next step, I have begun reading once again the second half of Al Jordan's book on creating a half-size osprey carving.  Lots of info there on painting, with a complete color palette.  I have all the colors already.  One difficult part will be transferring his painting instructions for a sitting osprey with wings folded to a diving osprey with wings extended.  The sitting osprey has less of the undersides of the wings exposed than my carving, so I will just have to extrapolate his color schemes to the extended wings.  I have plenty of photos to rely on, as well.  My final choices will be a combination of what is in the book and what I see in my collection of osprey photographs.  The author makes a point for artistic license himself, since ospreys all look a little different.  No one can say I'm wrong.

    Next step: sealing the carving with sanding sealer, and applying several coats of thinned-out gesso.  This will produce a uniform white base all over the carving, in advance of applying the colors.

    Five hours yesterday brings my total to 107.5 hours, rounded off to 108.  I don't think the painting will take another 100 hours, so my initial estimate of 200 hours for this carving was way too high.

    BTW, I did a full mockup of my idea for mounting the carving, with a curved metal rod supporting the carving above a base.  Didn't work.  The carving was too heavy for the 1/8" steel rod, especially with the curve, and the carving would not stay up.  I feel that I must do what I didn't want to do, which is support the carving with a vertical rod from the belly down to the base.  Oh, well.

Friday, July 22, 2022

Wendell Gilley Museum visit

      We visited the Wendell Gilley Museum in Southwest Harbor yesterday, as part of my birthday trip up the coast.  It is a small museum, but one dedicated entirely to bird carving.  I get a lot of inspiration, and even some carving tips, by examining the carvings they have on display there.  There were three osprey carvings, two by Wendell Gilley himself and another by a carver whose name I forget.  I took photos of them for my reference file, and the three carvings are shown in the images below.


     The poses are all very similar, with the bird perched on a limb or piece of driftwood, with wings spread as if taking off or just landing. The bottom carving is life-size, and is all the more impressive because of that.  None of them have the level of feather detail that I am adding to my carving.  My pose is different, an “attack” pose with the wings partially folded as the osprey zeroes in on his prey fish.  Still not sure about the base yet.  I will have to experiment tomorrow.

     I will return to my osprey carving with renewed determination to do my best at representing a dramatic moment during an osprey attack dive!

Wednesday, July 20, 2022

Feather texturing progress

    Yesterday (Tuesday) I brought the osprey to my local carving group meeting, where it was seen by seven of my carving buddies.  I borrowed an extension cord from the Rockler's back room and set up a wood burning station at one end of the long table that had been set up for us.  I was a little worried that the smoke from my burning would set off a smoke alarm or sprinkler, but the Rockler's staff assured me that I was OK.  It is wispy smoke, and didn't seem to bother either the smoke detectors or the others sitting around the table.

    I spent the entire 2.5 hours of the meeting working on the underside of the left wing, but still had to wait to finish it up today.  The job took 4.5 hours altogether, counting time spent this morning and yesterday afternoon. That is consistent with the time spent on the upper and lower surfaces.  Four and a half hours on each surface of each wing means that 18 hours have been spent so far simply on the texturing of the wings with the wood burning pen.  Below are photos of the undersides of the carving, with both wings done.


    The sharp color contrast between the burned and untouched parts of the wing are only temporary.  The burned portions represent the stiffer flight feathers and their coverts; the untouched portions of the wings represent the softer contour feathers that have been textured by various stone carving bits.  Once the carving has been covered with several coats of primer, the brown color will disappear, and the two types of feathers will be distinguishable only by the shadows and textures left by burning and stoning.  After priming, the feathers will be painted, further blending them into an overall representation of a fully feathered and functional wing (I hope).

    Below are photos of the upper surface of each wing. revealing the next session's 4.5 hours of work!  After the texturing of the wings has been completed, I will get back to my plan of setting the eyes in place and texturing the head feather detail around the eyes and bill.  After that, the final "construction" piece will be attaching the feet and smoothing the transition zone between the epoxy feet and the wood of the lower leg.


    I am looking forward to finishing up the carving and texturing part of this project, and moving on to the painting.  I will follow the painting scheme outlined in Al Jordan's book on creating a half-size osprey, as well as the many images I now have of the undersides and topsides of the wings and body.  I have all of the colors on Al Jordan's palette, and am ready to apply color to this carving!

    The 4.5 hours total from yesterday and today puts me over the hundred-hour mark, at 102.5 hours.  Where did the time go?


Monday, July 18, 2022

Right wing burning essentially done, topside and underside

    I managed to get out on the picnic table this morning around 9:00 a.m., and worked on the bird until about 1:30.  I had just about finished the topside of the right wing before it started to rain, and I burned the last feather while huddling under the big umbrella.  Lona came out and snapped the photo below of me early in the day, while I was first outlining and undercutting the feathers.  It was a good day - I had my music playlist of favorites playing on the iPad, the birds were chirping, there was a little breeze, and the time passed quickly. I hope for many more days like this, doing hobby work and enjoying the time!


    The right wing is now nearly done, with just a few touch-ups here and there to take care of.  I decided to complete one win, top and bottom, before moving on to the other.  I still have to put in the eyes and finish detailing and texturing the head, but I think I will complete both wings before I get to that.  The wings are too much fun!

    I will bring the osprey to tomorrow's (Tuesday) 4:00 p.m. meeting of the Southern Maine Wood Carvers Guild, and will continue the burning/texturing process there, surrounded by other carvers working on their own stuff.  The group usually moves from Rockler's to El Rodeo for dinner and continued conversation around 6:30, and I will likely follow along.  Nice group of very skilled people, all from different backgrounds but united in their interest in carving.  The combination of private carving time and group meetings provides a nice balance.

    Five hours today brings my total to 98!

    I will finish with some advice from Wendell Gilley, a renowned Maine woodcarver:Be it a perfect work of art, or one with some flaws, it really doesn’t matter - it is your creation.  What seems important to me is that you have come up with some results and you have enjoyed doing it.” I will be visiting the Wendell Gilley Museum in Southwest Harbor on Thursday, as part of my birthday trip down the coast, and will hopefully get some inspiration from viewing his carvings and those of other Maine artists.


Thursday, July 14, 2022

Burned-in detail on the feathers under the right wing

    Paying no attention to the well-defined next steps that I outlined in my previous post, I decided today to start burning the primaries and secondaries, and their coverts, on the underside ion the right wing.  I chose the underside again because any mistakes would be less likely to show.

    I used the woodturning tip to underscore the edges of the flight feathers so that the overlaps would look more real, to undercut the junction between the "hard" and "soft" feathers on the wing, and to define the fairly robust shafts on the primary and secondary feathers.  I worked about two hours outside, but had to quickly pick everything up in advance of a fast-moving thunderstorm.  After the rain, I ran a couple of errands, and then got back to the wing, but this time working inside.

    I managed to finish burning all the feathers on the underside of the wing that needed to be textured in this way.  The result of today's work is shown in the photo below.


    Again, the burning is for adding texture, not color, but the brown color does look dramatic at this point.  The feathers are more clearly defined and the feather groupings are more easily seen.  It is clearer now how the ten primary feathers at the outer part of the wing are beginning to fold under the secondaries, as the osprey nears the water surface.  I have to figure out just how to burn the details in the area up under the armpit; I can't get the hot tip of the burner up in there.  Not that anyone is going to look there, but I just can't leave it unfinished.

    I noticed two things today that I had noticed when doing my Archaeopteryx carving: 1) the grain in the pine wood that I used for this carving varies in hardness, resulting in darker or lighter burn lines; 2) the residual pitch in the wood bubbles up here and there when the hot tip of the burner passes over certain areas.  Basswood, tupelo, and other woods commonly used by bird carvers would not exhibit either of these tendencies.  I may carve something from one of these woods, maybe a smaller bird like a chickadee!  I do like pine, though, just not sure why.

    Today's work took at least four hours, for an approximate running total of 92 hours of carving.

    My bottles and tubes of paint colors all arrived today from Amazon and Jo Sonja.  Much more paint than I will need for this project, but I may use some of it again in the future on a ship model or another bird carving.

Wednesday, July 13, 2022

Fixed the beak, started burning

     I worked on restoring the beak this morning.  The piece of wood I had added was glued securely in place, so I shaped it to match the plans and pictures using my hand carving tools.  For this particular job, hand tools were better, since there is always a risk of taking too much wood off with the power carving bits.  The beak actually looks better now than it did originally, in my opinion.

    While I was working on the head, I enlarged the eye holes to a little more than 7 mm, the diameter of the yellow glass eyes.  I was tempted to set the eyes in place, but the experts say not to do that until the texturing and burning of most of the feathers in the head area are done.

    I was anxious to started the wood burning process, so after lunch I fired up the wood burner and got to work.  I started on the tail, and on the underside of the tail in particular, thinking that any mistakes I made because I was a little rusty would not show too much there.  I used the burning tip to underscore the tail feathers where they overlapped one another, and to undercut the rump and back feathers where they met the tail feathers.  The process went well on the underside of the tail, so I continued on the topside of the tail until I was done.  Below is a photo on the completed tail, after burning and after scrubbing with a wire brush to remove any char or "fuzzies" that might have been left.  You can see a few of the "splits" I added to the feathers, which are present on the feathers of all birds, especially those who make their living diving headfirst into the water at a high velocity. I will add similar splits to the wing feathers.  They won't be obvious after the painting is finished, but they will be visible and will add the the realism and visual interest of the carving.


      Although the brown color of the burned area is appealing, and actually close to the color of much of the bird, the purpose of the burning is to add texture, not color.  After the carving is sealed, it will be painted with a coat or two of diluted white gesso, which will cover the color of the burned feathers and provide an even white base for further painting. Yesterday I ordered little bottles of acrylic paint for each of the colors mentioned in the workbook about carving and painting a half-size osprey.  I thought about mixing the colors, but I want them to be right and so I just ordered such colors as "brown earth", "sable", "warm white", etc.  I had to use several online sources, since I couldn't find some of the colors locally.  The only one on the list that I already had was "nutmeg".

    Bolstered by my success with burning the tail feathers, I turned to burning the feathers on the head, which are of a different shape and texture than the feathers on the breast and back.  They are apparently somewhat stiffer, and have more pointed ends.  Some of them along the crest are longer than those on the top of the head and on the neck.  I used the burning blade to undercut the edges and ends of these feathers, and then added the barbs.  I am moderately pleased with the result, even though at the moment the pattern looks like that of an argyl sweater I once had. That somewhat disturbing visual will disappear with painting, I am sure.  I stayed away from the eye area, and will finish texturing and burning the head once the eyes are in place.  Below are some photos of the front end of the carving, showing the repaired beak and the burned feathers on the head.  It looks a little strange and half-finished, because it is.


    Immediate next steps: put in the eyes, finish burning and texturing the head, attach the feet, and texture and detail the transition zone between the wood part of the legs (feathered) and the epoxy clay part of the legs (scaly).  I can't attach the feet until I am finished with the head, because the feet with their extended toes would get in the way.  After attaching the feet, the next step will be the major wood burning work on the shafts and barbs of the wing primaries and secondaries on the top and bottom surfaces of the wings.  That will take a while!

    Putting in the eyes involves filling the sockets with epoxy clay, pushing the glass eyes in place, using the eraser end of a pencil to position the eyes just right.  Pushing the eyes into the clay-filled socket will cause some of the clay to squeeze out around the glass eyes.  This can be removed  with a toothpick.  When the epoxy clay is still workable, I will roll out a very thin strip to add around the eyes to simulate the lids.  This strip, once in place, will be lightly textured to look like skin, and will eventually be painted one of the dark colors (I forget which one at the moment).  The eyes will really make the bird come alive.  I remember the eerie feeling I had when I added the red eyes to my Archaeopteryx carving.

    I did some thinking about the support for the carving on my 3-mile walk today around the neighborhood.  I still favor having a brass or steel rod for a support, attached on one end to the underside of the rump just in front of the tail and curving around in a smooth arc to attach to the side of a heavy wooden base.  The bird would appear suspended over the base, and it center of gravity would actually be right over the base.  The surface of the base, according to my more recent fantasy, would be covered with subtle ripples to suggest water.  The base will most likely be black, or maybe one of the dark browns I will use on the bird.  I want it to be abstract and not complete with the carving itself for the viewer's attention.  From the front, the wire loop will hardly be visible, and the bird will simply look suspended over a rippled water surface.  I have found a YouTube video about how to achieve a rippled effect on a wood surface (the surface in the video was the seat of a bench, but the approach should work for a smaller piece of wood).

    Just had a thought: if I am going to be drilling a hole in the bird for the supporting rod, I should do that before I do any painting.  It will only be an 1/8" hole if I use a steel rod, maybe 3/16" if I use a slightly softer brass rod.

     The total hours so far?  88!

Monday, July 11, 2022

More feather detailing … and an accident

      I spent about four hours today completing the detailing of the body and wing soft feathers.  It was leisurely work, with a few breaks, and the result was good, I think.  The next step will be to fire up the wood burning tool and begin detailing the “hard” feathers, the primaries, secondaries, and tail feathers.  I can use the wood urning tool to define the edges of these feathers, and undercut the areas of overlap to provide a little more three-dimensional look. 

     Before I start burning, I will have to draw in the shafts of these feathers, which will be relieved as part of the burning process.  This is done by burning to mostly parallel lines to define the shaft, then burning the wood on the outside of these lines to lower the feather surface and effectively raise the shaft.  The barbs of the feathers can then be burned in by repeated smooth strokes of the burning pen from the shaft edge to the feather edge, very close together.

     I will also burn the feathers of the head, following the example in the “carving a half-size osprey” work book, including the feathers of the crest.  I probably won’t get to this until Wednesday, since I am at UNE tomorrow facilitating small groups for the first-year medical students.

     Oh, yes - the accident.   Today What I feared might happen actually did.  While moving the carving around, trying to get the carving bit into the nooks and crannies of the carving, I broke the tip off the beak.  I had thought I would do the beak last, but my curiosity got the best of me and I thinned it down the other day.  Bad idea.  The hook of the beak crosses the grain, making it weak, and it snapped off sometime this afternoon.  I didn’t notice until I was putting my tools away.  I sanded the area of the break smooth and flat, cut a small piece of pine from a spare piece of wood, and glued it in place.  After the glue dries thoroughly, probably on Wednesday, I will re-shape the beak and restore the deadly-looking hook.  It will be stronger than it would have been, since I glued the little block on with the grain going in the direction of the beak tip, providing maximal strength.  Also, the original beak tip lay in the midline, where there was a glued seam between two of the layers comprising the body and head of the bird.  The new piece is solid, and lies over the midline and this seam, and will make for a stronger beak.

     I realize I didn’t take any photos today, so I will just include one from my osprey reference photos.  Four hours today makes the running total 84 hours, and counting.


Sunday, July 10, 2022

Feathers all outlined; detailing begun; feet

      Today was a beautiful day to work outside!  I spent about 5 hours out on the picnic table, working away at a variety of tasks.  First, I refined the feet to look a little more like the osprey feet in my reference photos.  I sanded down the toes to make them thinner, accentuated the pads, and gave the feet some texture.  The photos show that the feet are covered with reticulate bumps, and I experimented with ways to add this texture.  None of them were successful, so I resorted to a trick I have used in ship modeling.  When the hull of a boat or ship is plated with copper (of zinc, in the case of the model I did a few years ago), the rivets are often simulated by running a pounce wheel along the edge of the thin metal plate.  This produces a series of regularly spaced indentations that the viewer’s eye interprets as rivets, even though the heads of rivets would be raised above the surface of the plate, rather than indented.  A true “trick of the eye”.  For my osprey feet, I simulated bumps by using a small diamond ball to make indentations on the surface of the feet, which the viewer’s eye would likely interpret as bumps because of the uneven texture.

     I drew in the remainder of the feathers on the breast area between the extended feet, and used my small diamond ball and a flame-shaped blue stone tip to outline the feathers, simulate the feather overlaps, and round off the sharp edges.  I then proceeded to texture the contour feathers with an inverted cone stone tip,  adding lines on the feathers to simulate the vanes of these soft feathers.  This took most of the time, especially because some of the feathers were hard to get to because of shape of the carving.  I got most of them done before I got tired and was afraid of making some mistakes.

     All in all, a very productive carving day.  Now it is time for  Moxie’n’Morgan while sitting out under the canopy, watching my real-life feathered friends perch on the feeders and fly in and out of the birdhouses. 

     Up to a total of 78 hours, approximately.  Here I am, hard at work!


Friday, July 8, 2022

Legs and feathers

     After reviewing my progress on the carving and looking over reference photos, I decided to make some changes to the legs.  I had tried to finish drawing the feather patterns on the carving, but couldn't figure out the transition between body feathers and legs feathers, especially when the legs were extended. I had tried to draw a feather pattern that curved around from the body onto the legs, but this required the feather overlap to reverse direction.  It just didn't look right.  I looked through my reference photos, and found some that revealed how the legs simply stick out from under the contour feathers of the body, so no gradual change in feather overlaps would be necessary.  I drew a new feather pattern to accommodate this new finding, and recontoured the junction of the legs and body legs to reflect this change.  I made the wooden part of the legs a little thinner as well, to reflect what I saw in the photos.

    I have worked on the carving three times since my post, so I have come catching up to do in this post.  Today, I outlined and shaped most of the body feathers, excerpt for the narrow space between the outstretched legs.  A few days ago, I had outlined and shaped the feathers on the head, which are smaller than the body feathers and come to a sharper point.  I was able to suggest the presence of a crest, and will separate and lift the feathers of the crest in a future session.

    Now and then, while I am carving, I switch locations just to break things up a bit.  Today I used a diamond-shaped stone bit to clean up the feather overlaps on the wings.  I have found that the best way to do this is to let my eyes wander randomly around on the carving until I see something that needs cleaning up, fix that, and then look around some more.  I suppose this is not as methodical as working along a row of feathers, but it feels freer somehow. 

    After working on the body feathers around the belly area and doing some of this random touch-up work, I tried sanding the feathers with a medium grit sandpaper to round off all the edges and give them a softer look.  It worked, and the feathers look and feel softer.  Feathers have a curved surface, and the sanding took some wood off the edges to give the curved look. I am pleased with my progress so far.  Below are some photos I took after I finished up today.


    You can probably see that I have made some progress over the last week or so, especially around the head area.  I have added some details to the bill, relieved the head feathers, and drilled holes for the eyes.  I also did more work on the feet the other day.  Little bit here, little bit there, that's how this carving has been going.

    I may not have it finished by August 13, the date of the Maine Woodcarvers Show, but will certainly have it finished by late October for the New England Woodcarvers Spirit of Wood Show.  I got a ribbon for my Archaeopteryx carving at that show last year.  I also have my sights on the Rhode Island Audubon Society's Wildfowl Art and Carving Show, which will be in early November.  Not sure why, but we went to that show when it was last held in November 2019, and it was fantastic.  It would be nice to enter my osprey in that show and see what happens!

    I estimate eight hours of work over my last three sessions, for a total of 73 hours.  Closing in on 100 hours!

Tuesday, July 5, 2022

More work on the feet

     This afternoon I did more work on the feet.  I further defined the shapes of the pads on the undersides of the toes and the overlapping scales on the upper surfaces.  I purposely "dislocated" one of the toes on the left foot and repositioned it slightly to change the "cross" arrangement of the toes to the more realistic "X" shape.  I thought I might have to do this with both feet, but the right foot looked OK.

    I shortened the tarsometatarsus to make the proportions more like those I saw in my reference photos, and bulked up the shaft with epoxy clay to match the diameter of the carved, wooden portion of the leg.  I also bent the wire armature slightly at the point of insertion into the wood to give the leg a little more biological realism.

    The photos below show my progress today, which was cut short somewhat because of a rain shower that drove me inside.  You may notice in the photos (or at least you will after I mention it) that I broke off some of the toe claws.  I will glue new claws in place once the epoxy hardens.  The legs are not permanently in place, I can easily pull them out.  When I have eventually glued them in place, I will fill any gaps in the seam with epoxy clay, allow that to harden, and then carve and detail a smooth transition between the wood and epoxy parts of the legs.


    I think you will agree that the legs look less "cartoony" and more in proportion to the body and head.  That will do it for today, I think I will sit out in the yard under the canopy for the rest of the afternoon, listening to the raindrops, looking at the birds on the feeder with my new binoculars, and/or reading my book.

    Sixty-five hours now.

Saturday, July 2, 2022

First "draft" of feet (revised)

    I met with my friends in the local Southern Maine Wood Carving Guild this afternoon, at Rockler's near the Maine Mall.  Instead of working on a wood carving, I chose to sculpt some feet for my osprey carving out of epoxy clay over a wire armature.  The group agreed that it was OK for me to work with something other than wood for this meeting.  Actually, they didn't care what I was working on, as long as I was doing something creative!

    I had already twisted four strands of aluminum wire together to form the parts of the foot and toes, so I was ready to go with respect to fleshing out the foot.  I also already used some epoxy clay to make a collection of scale-size claws.  I had rolled out the clay into narrow cone shapes, cut off the ends, bent them around a dowel, and let them dry overnight.  Below is part of the collection of claws, with a pencil for reference.  The epoxy clay became sufficiently hard to preserve the very sharp ends.  I made more than enough, in case some broke, bent, or were otherwise damaged.

    At the meeting this afternoon, I mixed small batches of clay and formed it around the upper part of each foot, locking the twisted wire in place.  This is a good point to insert a short discussion of avian leg anatomy. The osprey's toes are indeed its toes, but they are connected to a long bone (the tarsometarsus) that looks like a shin but really is the fused tarsal and metatarsal bones of the bird's foot.  Imagine that you are standing on your toes and imagine that the bones in your foot between your toes and your heel are elongated and fused together into a single bone.  This bone, the tarsometatarsus, is thin but strong, and is usually covered with scales.  Some birds, however, such as owls, have feathers on the tarsometarsus extending all the way down to the toes.  The twisted wire armature around which I applied epoxy clay therefore corresponds to the tarsometatarsus.

    Similarly, in a bird, what corresponds to our actual shin bone is called the tibiotarsus, a bone comprised of the tibia (which we have) fused with the two tarsal bones (talus and calcareous) that form our heel and the joint between the tibia and the foot.  A bird's ankle is not quite in the same place as ours, since the end of the tibiotarsus articulates with the proximal end of the tarsometatarsus.  Our ankle is the end of the tibia itself articulating with the calcaneous bone in the foot.  Birds do have a fibula, the smaller of the two bones in the lower leg, but it is short, splintery, and doesn't reach all the way to the ankle.  The image below of the bones in a typical bird leg should provide a visual explanation of what I have been trying to describe.


    The osprey's heel, then, is actually near the point where the feathered part of the lower leg (tibiotarsus) ends and the scaly part (tarsometatarsus) begins.  That's why a chickadee’s skinny little legs may look like they have a knee that bends backwards.  It is not the knee you're seeing, but the heel.  The knees of a bird's legs are usually covered up by the contour feathers on the sides of the body. 

    My carving so far has stumps for legs, and the ends of these stumps represent the approximate location of the heel joint between the tibiotarsus and the tarsometatarsus.  You will see what I mean in the pictures below.

    Mixing the clay in small batches again, I made the toes, which on the carving are about one inch long.  Since this is a half-sized carving, imagine the toes being about as long as your little finger.  I used my sculpting tools to add pads to the bottoms of the toes, and scales to the upper surfaces,  I then pressed into the end of each of the toes one of the pre-made claws, and formed the clay around it.  I could make about two toes before the epoxy clay became too hard to use.  I then mixed more, and did a couple more toes.

    I was able to finish this rough draft of the feet during the three-hour carving club meeting, and brought them home.  The next step was to determine the actual length of the feet, based on the plans I have, and I needed to cut away some of the hardened clay at the top of the foot to get the lengths correct.  I drilled holes in the "stumps" of the carving, and inserted the exposed ends of the twisted wire armatures into the holes and - to my surprise and satisfaction - the result actually looked something like extended osprey feet!


    The photos above were set up in a hurry, because I was excited about how the feet looked, so the lighting isn't great, but I think you can see where the process is going, even though it looks cartoonish at the moment.  I will add more clay bulk to the upper part of the foot where it makes contact with the wood, and then carve the whole leg assembly to produce a smooth transition in size and shape along the leg.  I will also bend the wire armature a little to suggest a slight flexure at the heel, which I have seen in photos.  This will eliminate the appearance of perfectly straight legs, which are seen in some of my reference photos of real ospreys but which might look a little artificial on a carving.  The epoxy clay I chose for the feet has the consistency of wood when it hardens, so it can be carved, sanded, detailed, etc., just like the real wood of the body and upper legs.

    I may fiddle a little bit with the configuration of the toes, to give an appearance closer to the "two toes forward, two toes back" appearance of the feet that I have seen in my reference photo collection.  At the moment, one of the feet has the four toes at nearly right angles to each other, forming a square cross, which is not quite correct.  I will also shorten the tarsometatarsus, because my reference photos of diving ospreys show that the bases of the toes is just below the tip of the beak.  My first draft legs are a little longer than this, and I can easily cut them back.

    In the photos above, you may also see some reference lines I have drawn on the head, to help me carve the shape of the head, the border between the head and the beak, and the small crest behind the head, and keep everything symmetrical while doing it.  Also marked is the position of the eyes; two pairs of 7 mm yellow arrived in the mail this week and I can't wait to set them in place after I shape the head and detail the head feathers.  I have done a little shaping of the head over the past few days, using my hand carving tools rather that power tools.  I did this mostly because it was too hot and humid to sit outside on the picnic bench in the morning or afternoon sun.

    I will not permanently attach the feet until the carving is ready to be mounted on its base (whatever that might look like), for fear of damaging the toes and the rather delicate claws.  When the feet are completed, I will post a few photos of them in place, then remove the feet and finish the rest of the bird.  The feet will be glued in place only for the final steps in the painting process.

    Counting the time spent making the claws and armatures, the time spent on shaping the head, and the time spent at today's carving group, the running total is now up to about 63 hours.

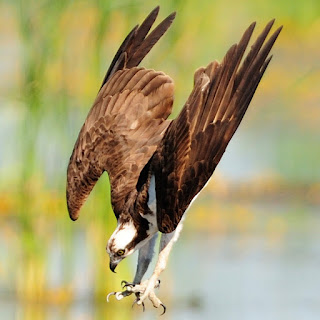
New “official” photos of the diving osprey

 I have finally taken the time to photograph the osprey carving against a photo paper background with decent lighting.  It is not quite as g...